Server Installation
On the server side of YaPlm, the SQL server and its database as well as file vault are located. The server installation is divided into the following steps:
-
Set up the file vault
-
Creating a domain user for vault-service
-
Install YaPlm Desktop
-
Install MS SQL server
-
Add the YaPlm database
-
Assign the file vault directory
-
Assign the users working directoryThe instructions provided here assumes you have been provided with:- YaPlm desktop installation file: YAP_Client_Setup-YaPlmXXXX-1.7.XXX.X.exe- YaPlm database: e.g. XXXX.zip
Always consult your YaPlm supplier before setting up a YaPlm server environment to make sure you get the best performance in the system
|
1. Set up the file vault
- Create a shared folder on the server called \YaPlmVault
- Add any files that may have been included in the installation-kit
Don't forget to assign user-permissions according to step 2
|
2. Creating a domain user for vault-service and set permissions
- Create a Domain user called YaPlmVaultUser
- Choose a working directory for users (default is C:\YaPlm\YaPlmDemo\<user.Username>\ but can be changed, see Step 7)
- Assign the following Windows permissions for YaPlmVaultUser:
|
|
File Vault
|
Users Working directory
|
|
YaPlmVaultUser
|
Full Control
|
Full Control
|
- For all windows users running the YaPlm Desktop Client the authentication shall be set up according to:
|
|
File Vault
|
Users Working directory
|
|
YaPlm Windows User
|
Read
|
Full Control
|
Only the user YaPlmVaultUser shall have change /write /delete permissions in the vault
|
3. Install YaPlm Desktop
Run the provided YAP_Client_Setup-YaPlmXXXX-1.7.XXX.X.exe file on the server and follow the instructions. For a full description see Client Installation.
4. Install MS SQL server
Please refer to Microsoft SQL Server Documentation for installing the server, but make sure that:
- authentication mode is set to Mixed Mode security
- collation is correct (e.g. Finnish-Swedish)
- remote connections are allowed
- TCP/IP is enabled and the ports are open and not blocked (e.g. by firewall)
- the user that will be used to create the database is enabled
Supported SQL server versions are found under System Requirements and Compatibility.
The authentication mode in SQL Server must be set up to use Mixed Mode Security
|
5. Add the YaPlm database
The database provided by your YaPlm supplier shall be restored into an empty or existing database. You can select to use the sa user or adding another user in SQL server, however the user used by YaPlm (all clients and services) must be a DBOWNER.
One way to restore the provided database is to use the DatabaseLoader-tool which can be found in the installation directory of YaPlm Desktop (default: "C:\Program Files\YaPlm Desktop\DatabaseLoader.exe"). This tool provides an interface (see image below) where the necessary information can be provided. Press Load Data when done.
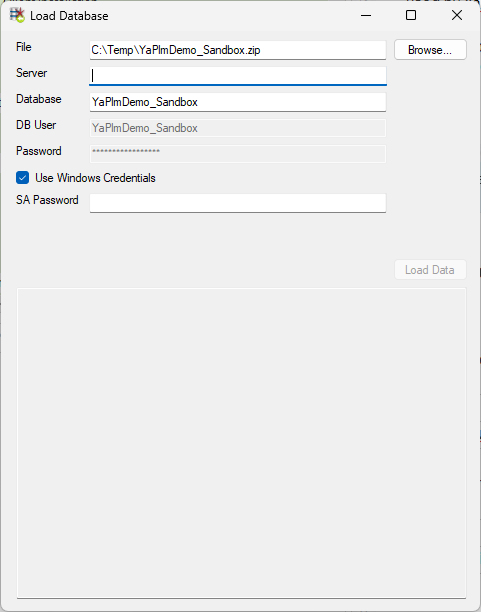
File: Location of provided database-file
Server: Name of server where the database will be restored
Database: Name of database to be created or replaced
DB User: Name of existing database user or database user which will be created, this user is then used by YaPlm clients and services
Server: Name of server where the database will be restored
Database: Name of database to be created or replaced
DB User: Name of existing database user or database user which will be created, this user is then used by YaPlm clients and services
Password: Password for database user named above (DB User)
Use Windows Credentials: If checked the current Windows-user is used for access to server
SA Password: If set the sa-user is used for access to server. (If "User Windows Credentials" is not checked and "SA Password" is left empty the "DB User" and "Password" are used)
6. Assign the file vault directory
- Start YaPlm Desktop and log in as a user with Administrator privileges
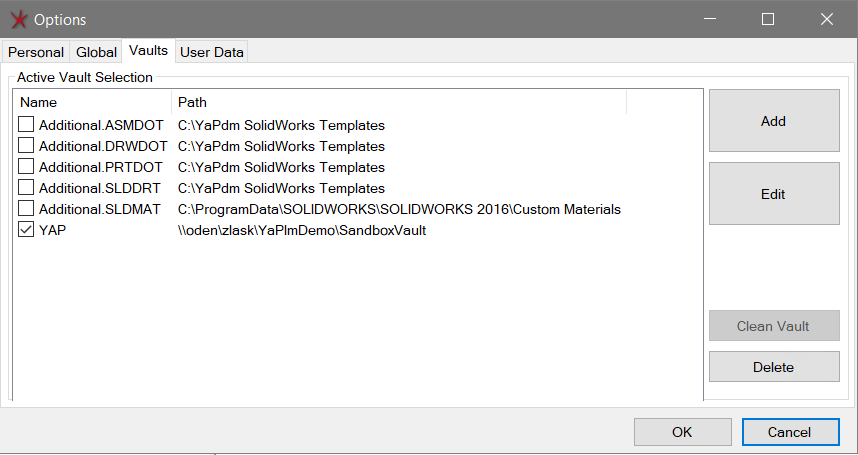
- Go to Tool - Options - Vaults (see image)
- Select the active vault (the one that is checked) and press Edit
7. Assign the users working directory
- Log in to YaPlm as an user with Administrator privileges
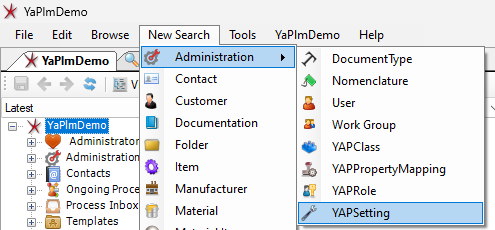
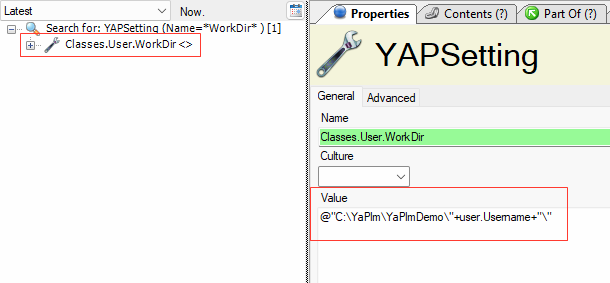
- Search for settings by going to New Search - Administration - YAPSetting (see image)
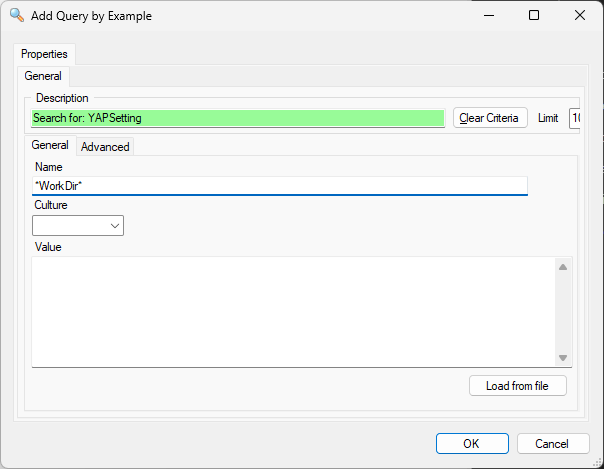
- Write *WorkDir* in the Name-textbox and press OK (see image)
- Set the value for the setting Classes.User.WorkDir to desired working directory location (make sure the YaPlmVaultUser from Step 1 has correct Windows permissions)
The YaPlm Rule Evaluator can be used to set the location of the working directory. Please contact your local YaPlm supplier for more information how to use the Rule Evaluator
|